Integrating Rust into Python
Read this blog detailing the specific mechanics of integrating Rust with Python to increase performance, with very little effort.
In my last blog post, I detailed how making a very small change to some complex production Python code, introducing Rust to handle a code hot-spot, led to dramatically better performance while leaving the bulk of the code in an easy to understand maintainable state.
The benefits are real, such a change allowed Vortexa to execute a production release process a day faster, every time.
Now is the time for more details.
A specific example
I’m going to walk through an example Python project which uses Rust for some calculations. My goal is to show how the language integration happens, how easy it is, and how threads can easily be leveraged with some caveats, not flood you with endless pages of Python code.
The code (which can be found in this GitHub project), will do the following:
- Read 42625 records of AIS (vessel positions) data into a Pandas DataFrame
- Multiply that data 1024x so we have over 43M records to process, to making performance numbers more meaningful
- Read in five GeoJSON polygons into strings
- Instantiate a simple Rust Point-in-Polygon library using those GeoJSON strings
- Extract NumPy arrays for the latitude and longitude coordinates
- Call Rust, getting a NumPy array back containing the index of the polygon for each point (or -1 if nothing found)
- Print some performance information and results statistics
Building the code
I used Python 3.7.9 and Rust 1.51.0 under macOS Catalina for testing. Use pip or your favourite package manager to install the Python dependencies from the requirements.txt file. To build the Rust library, having installed Rust, run this command:
cargo build –release
Once built:
- On Linux, copy target/release/libpip.so to pip.so
- On macOS, copy target/release/libpip.dylib to pip.so
- On Windows (not tested), copy targetreleaselibpip.dll to pip.pyd
Non-Windows users can of course add a symlink instead of copying if they wish.
The Python Code
There are two Python files, single.py and threaded.py for single vs multi-threaded tests. They are identical, apart from the name of the Rust method which is called.
They start with imports:

The first line actually imports our Rust module. Then we have Pandas, NumPy and for profiling, PyInstrument.
Next we read the AIS data into Pandas and multiply it by 1024x:

The AIS data looks like this:
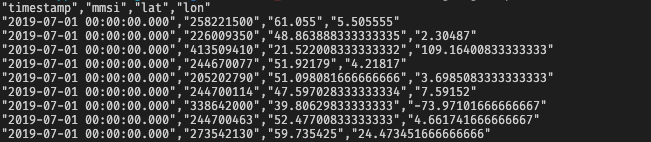
Timestamp is when the signal happened (we have 5 minutes of data in this file), MMSI is the identifier of the vessel, and lat & lon are the latitude and longitude GPS coordinates of where the vessel was.
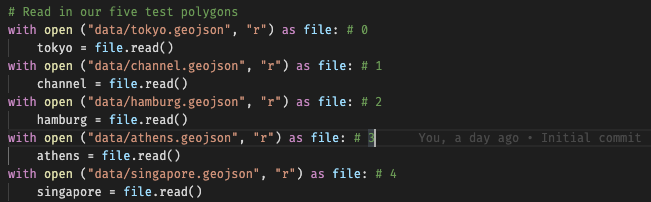
We need to read the five GeoJSON files too which contain the geometry we’ll use for testing:
Note these are just roughly drawn polygons for testing. For example, Tokyo looks like this:

Next we start profiling:

We’ve imported our Rust module, but we need to instantiate it as a Python class:

Note having passed the array in above, we are effectively saying Tokyo is polygon 0, Channel is polygon 1, Hamburg polygon 2 etc.
Before we can call Rust to do the work, we need to extract the ~43.6M latitude and longitude coordinates as NumPy arrays:

We can then call Rust, which produces a NumPy array of integer results which we plug back into Pandas.

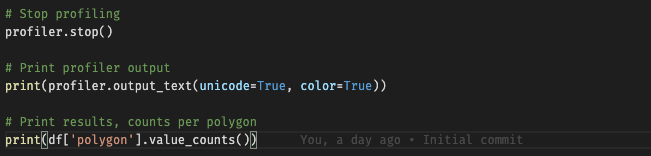
Finally we stop the profiler, output the profiling results, and output the value counts from our DataFrame.
So this is all very straightforward, the Rust module is called like any other within Python.
The code produces the following results, showing the signal counts per polygon. The values can be interpreted as either -1 (no polygon matched) or the index of the polygon within the array passed to the pip.Engine class’s constructor. So here we can see Hamburg (2) got 951296 signal matches, and over 40M signals didn’t have any match.

The Rust Code
There are two files of interest, Cargo.toml and lib.rs .
Cargo.toml, the requirements.txt of the Rust world, is bringing in our dependencies, but also defines what kind of library we want to build (a shared library so Python can load it), and also some necessary extensions. See the PyO3 usage notes here.
lib.rs contains the Rust library source code. Let’s look at this in outline first.
After the imports, we have this (implementation details hidden):
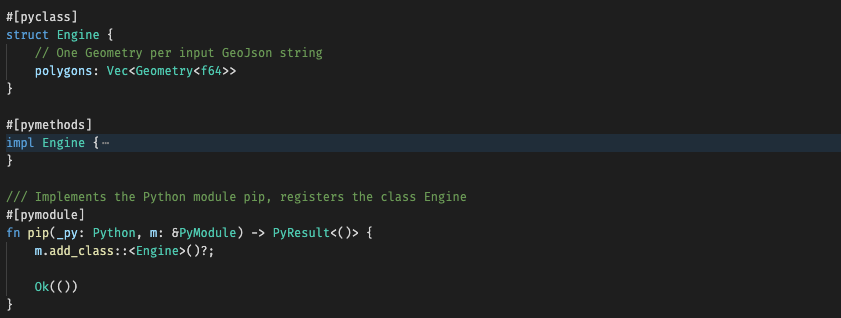
The attribute [pyclass] decorates the classes we want to expose via PyO3, [pymethods] decorates the methods we wish to expose to Python, and [pymodule] decorates the module we wish to export to Python. You can see the module code, named after the module, adds the class definition to the module.
The Engine class’s constructor is shown below, with a [new] attribute which tells PyO3 to expose this as a constructor to Python.
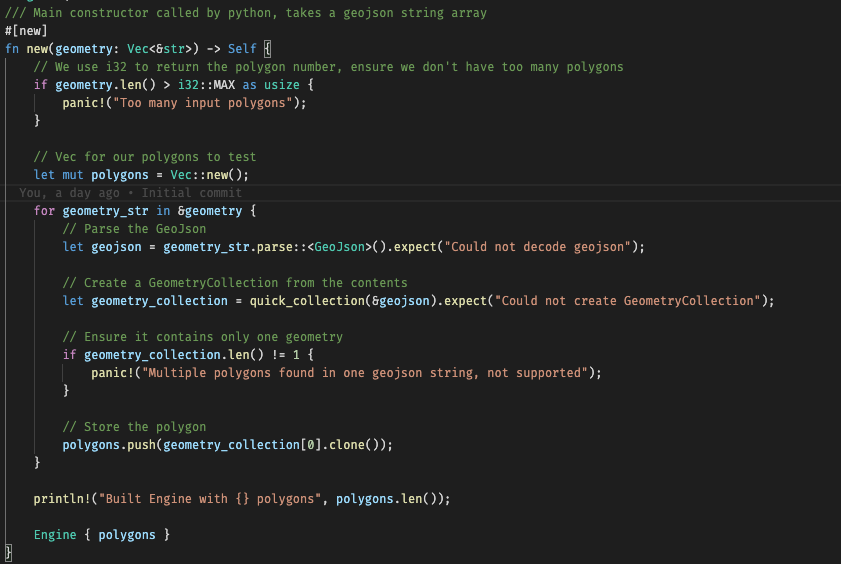
This code takes each GeoJSON string in the array passed from Python, decodes it into a GeometryCollection structure, and extracts a single polygon from this and puts them in an internal Vec.
We then have three other methods which are exported to Python:
- pip_1 – check one coordinate pair against our polygons, return the the polygon number which matches, or -1 if nothing found
- pip_n – take NumPy arrays of coordinates in, and using a single thread call pip_1 for each, returning the results as a NumPy array of polygon numbers
- pip_n_threaded – as above, but using threads for efficiency
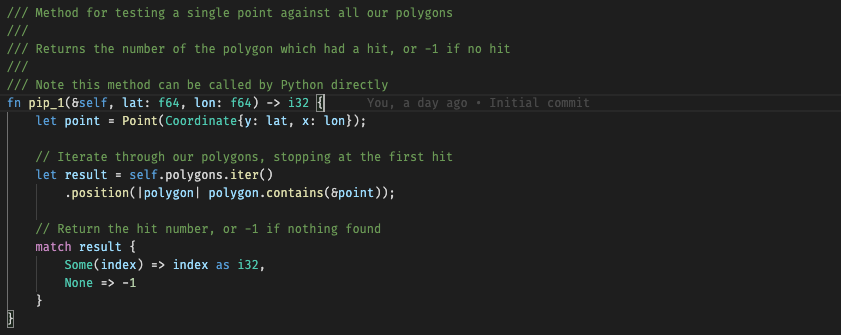
The pip_1 method is just iterating through the polygons, finding the first which matches the given coordinate, using library code to do the math. The other two methods are interesting, as they showcase how Rust can really add value to Python.
Using a Single Thread – pip_n
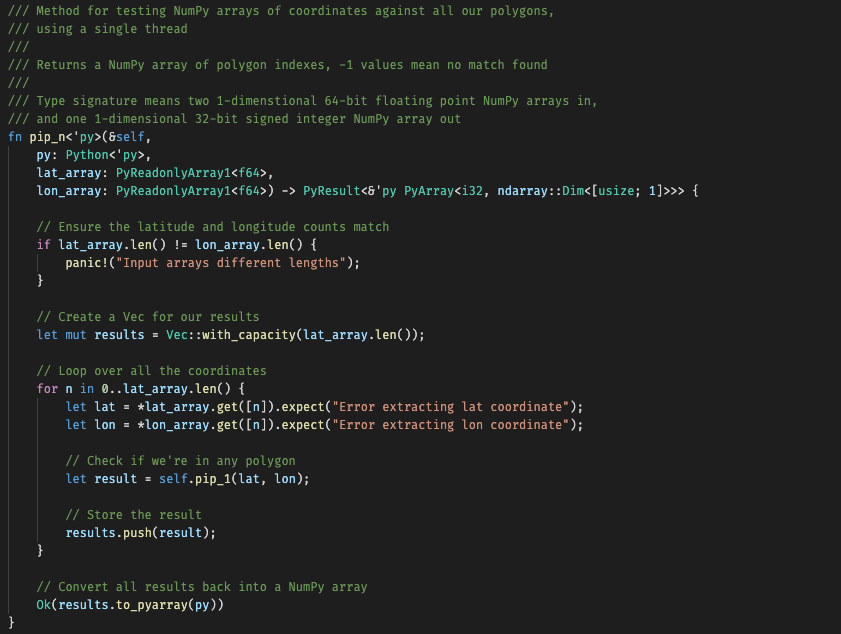
The code checks the NumPy arrays of latitude and longitude are of equal length – it makes no sense otherwise. Our results will also be this length, so a Vec<i32> of this capacity is created.
We then simply loop through all the coordinates, converting them from PyObjects to unwrapped f64 values, and then pip_1 is called and the result recorded.
The final results are converted back to a NumPy array.
On a 2.3GHz quad-core i7 Mac, this produced these performance figures:

Not bad, we’ve compared ~43.6M signals with 5 polygons in about 12.9 seconds.
Using multiple threads – pip_n_threaded

The code starts the same way, checking the input lengths.
The incoming NumPy arrays contain PyObjects, which do not implement Sync – they cannot be used concurrently by multiple threads.
Thus we use a single thread (alas) to unwrap the coordinates, producing a Vec<(usize, f64, f64)> where the tuple contains the coordinate index and the latitude and longitude values. That index is about to become useful.
We use the rayon crate to iterate through the above immutable Vec in parallel, checking to which polygon each coordinate pair belongs (often none), filtering out the results which missed all polygons, and storing the rest in a Vec<(usize, i32)>. The tuple contains the coordinate index and the polygon number which hit.
We then create the results array of the right length, initialized so every element says no polygon matched. We then iterate through the results of what did match, a small subset, and alter those Vec elements only.
Finally the results are returned as a NumPy array as before.

Here the processing took about 5.3 seconds on the same machine, so approximately twice the speed of the single-threaded code. Note we’re not trying to compare with Python code, merely compare the threading approaches.
But this doesn’t add up?
You’re right, using four cores and getting about twice the performance does not add up.
If we were just using pure Python and we attempted multi-threading, the Python Global Interpreter Lock (GIL) would lock the resources such as the NumPy arrays, causing a great deal of contention and drastically slowing the code. Cloning the data could alleviate this problem.
Rust makes the distinction between types which can be shared between threads (they implement Sync) and those which cannot. We also can’t send data to another thread which doesn’t implement Send either. So we cannot use Rust multithreading directly using the NumPy types.
If our Rust code is to leverage threads, the data bound up in the non-thread-safe type needs to be converted to a thread-safe type. This is not a simple cast, it is work the machine has to do using a single thread. Having done this work, parallel threads can now access this new type.
Likewise, once parallel processing is complete, the results need to be returned. As we’re returning data to Python, the result will be in a non-thread-safe type, so again a single thread has to do the work of the conversion.
Thus although we leverage Rust’s speed (and type safety), we need to do extra single-threaded work in order to enable multi-threaded processing. Amdahl’s law states that we can only use threads to speed up the part of the program amenable to parallelisation.
Is it worth it? Absolutely. In this example, we have a very small number of simple polygons – the amount of work done in parallel is small. Add many more polygons, with more complex geometry, and the proportion of the work which can be run in parallel will rise, as will the benefit. The type conversion overhead can become insignificant.
Conclusions
I won’t make light of the effort to learn Rust, with its somewhat unique angle on memory ownership and sharing.
Once in the Rust world, writing lightning fast code is easy and leveraging threads is a lot simpler and more efficient than in Python. Using crates like ndarray allows Rust to leverage NumPy, making Pandas integration trivial, with PyO3 gluing it all together.
So let your imagination loose! Use Python for what it does best, and when you hit those edge cases where you need more performance and Python can’t deliver, leverage Rust.
Vortexa
I am lucky to work in such an environment that an experiment such as the one above can and does lead to tangible results in our production systems rather than just remaining a curiosity. Vortexa are hiring, come and join this amazing team and push engineering to the limit.


